
My bedroom is the last room in the house to get any kind of decorating attention. With my husband being on night shift, I don’t have a whole lot of time to be in there doing things because while I’m getting up for the day, he’s getting ready to go to sleep. So over the past couple of weeks I’ve slowly been working in there. One of the projects to soften the mood of my bedroom was a new light fixture. I fell in love with the look of the wooden bead chandeliers. I also really love the challenge of making things myself, and saving the extra money never hurts my feelings either!
After stringing nearly 3000 beads, this is what is finally hanging in my bedroom:
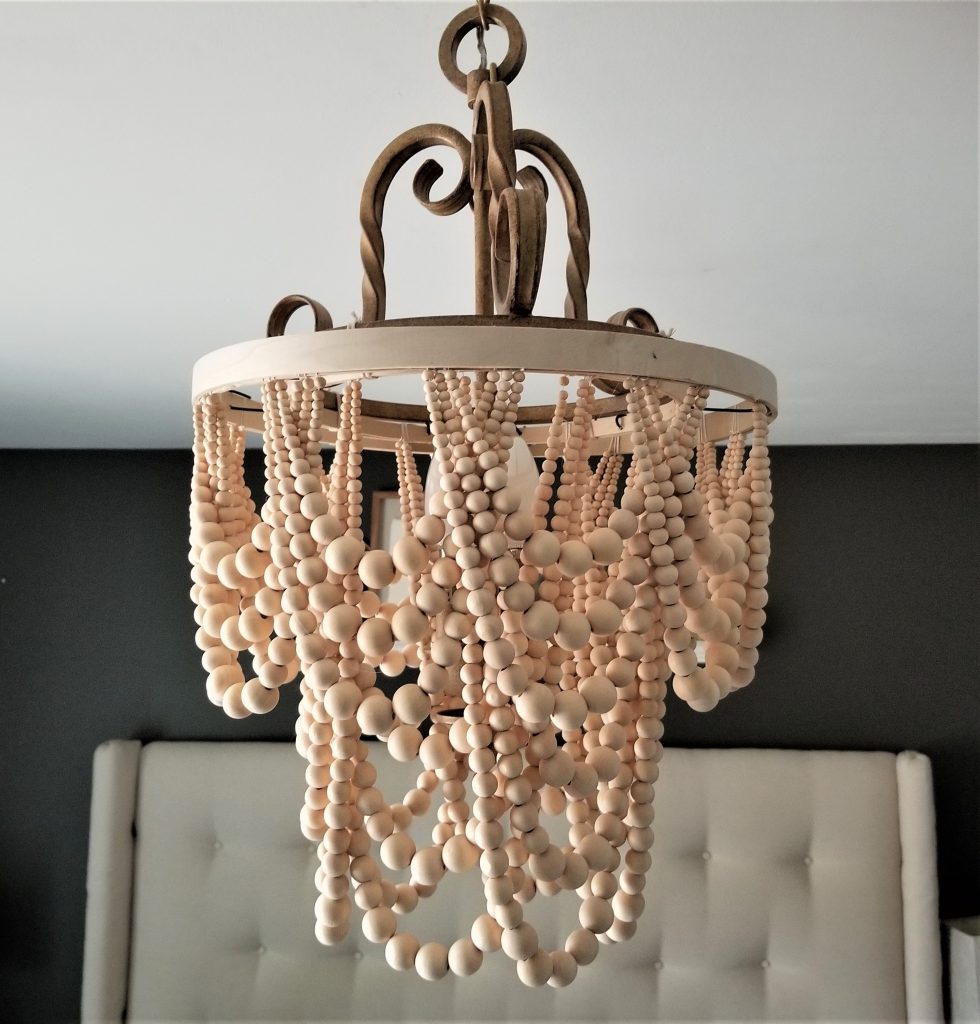
The chandelier came from the local Habitat for Humanity Restore. It happened to have the perfect size ring around the bottom where a large glass globe used to be attached.
I put the beads on lengths of some string I had leftover from another project.
The strings were attached to quilt hoops in two different sizes. I used a 10 inch hoop and a 12 inch hoop.
I ordered the beads themselves from Amazon. They came in batches of 1000 for around $16. Here is a link to the ones I used: https://www.amazon.com/gp/product/B08B3CYFPJ/ref=ppx_yo_dt_b_asin_title_o01_s00?ie=UTF8&psc=1

It took me a while to figure out the pattern to get each string of beads to lay in swags together. I started with the longest string on the smaller hoop, which had the longer swags.

The next string had a few less beads so it wouldn’t be as long. I picked a rainy day and parked myself in front of the TV. After a couple of episodes, I had a pretty good start.

Quilt hoops come with two hoops. One has a tightening device and the other is just a hoop. So for this, I took the inner hoop without the tightening thing on it, and just tied my strings of beads. I made them tight enough that they wouldn’t sag away from the hoop, but loose enough that if I needed to slide them around later, I would be able to.

After I was done with the entire hoop, I made sure each group of 3 strings was evenly spaced and tightly secured. I trimmed all of the excess strings and prepared the outer hoop. To do this, I removed the tightening device and any of it’s attached parts.

I then placed the outer hoop around the inner hoop to cover all of the strings that were exposed. To secure it, I just put a little hot glue in random places between each hoop and pressed them together until the glue was cool. I chose one side of the chandelier to be the “ugly side” so that when it was hanging, you would be much less likely to see these holes. I am certain there are things you can do to repair the holes so there is no “ugly side” of your chandelier. I’m thinking wood filler and some sand paper would probably get you pretty far. If I’m being honest, I just didn’t care all that much because this was just going in my bedroom and once it gets up on the ceiling I’ll probably never look at it very closely again.
Here is what it looks like from the top. The outer hoop is covering all of the strings that are attached to the inner hoop.

You can see from the side that it looks much better.

Take note that I did not put the outer hoop on the bigger hoop. I will do that later.
The next step was where I really started winging it. I had to come up with a way to attach the hoops together so they hang cohesively. I used a drill to make holes in the hoops and placed a wire in between them to attach them together.


I put wires all around the circle at six different points to make sure that the wire would be strong enough to carry the weight of all the beads.
I used some pliers to curl the inside end of the wire so it held on to the inner hoop. I then bent around the outer end of the wire so it went back toward the center. This ensured that the wires wouldn’t let the hoops slide around.

After I had enough wires holding the hoops together, I added the outer most hoop to the big hoop like I did before, covering all of the exposed strings.

Next, I had to modify the chandelier so that my beads would be able to hang from it.

I’m not going to go into too much detail about what I had to do because the chances of you having the exact same chandelier for this exact project is going to be pretty small.
In it’s previous life, this chandelier was attached by a chain. I did not want the extra length from the chain because the ceiling in my bedroom is just 8 feet tall. My husband and I had to perform surgery, but we shortened it up quite a bit.

After the chandelier was prepped, I had my husband install the light. If there is one thing I refuse to do, it’s electrical stuff. No thanks. I completely forgot to even take a picture of this part, oops! All that happens here is that he installed the light on the ceiling without my beads. It was much easier to attach the bead hoops after the light was already hanging.
Once the chandelier was ready, I had my husband hold up the beads and I tied the inner hoop to the metal hoop of the chandelier. It may have looked better if I put the bead hoop on top of the metal hoop of the chandelier (this is getting confusing, talking about all of these hoops!) but there was just no way I was going to ask my husband to take down the light so I could put it on top. He already grumbled about the light enough!

One thing I was worried about was the amount of light that would travel through the beads. I wondered if it was going to be bright enough to light up the room. It’s hard to give you a good idea of how bright the light is, but this photo shows you how much light comes through.

This is how it ended up. I really love how much interest it adds to my bedroom. I think it pairs well with the oatmeal color of my headboard and pops beautifully against the black wall. There is room for improvement, certainly. What I love most about these projects is that I know I made this, and it cost me less than $50! That is a fraction of what I could have purchased this for in the store.

Good luck!