
One of the most exciting projects we’ve been working on (and has been taking up all of our time) is the fireplace. The mantel was becoming a source of major frustration because, well, we don’t like to spend money. We did find one that we liked for a reasonable price but it wasn’t giving me a warm fuzzy feeling inside when I looked at it. I finally decided it was time for me to just buckle down and DIY a faux barn beam mantel and get it over with.
This is what we were starting with. It’s pretty right? Yeah… if you squint your eyes and push your cheeks together. You just tried that, didn’t you?
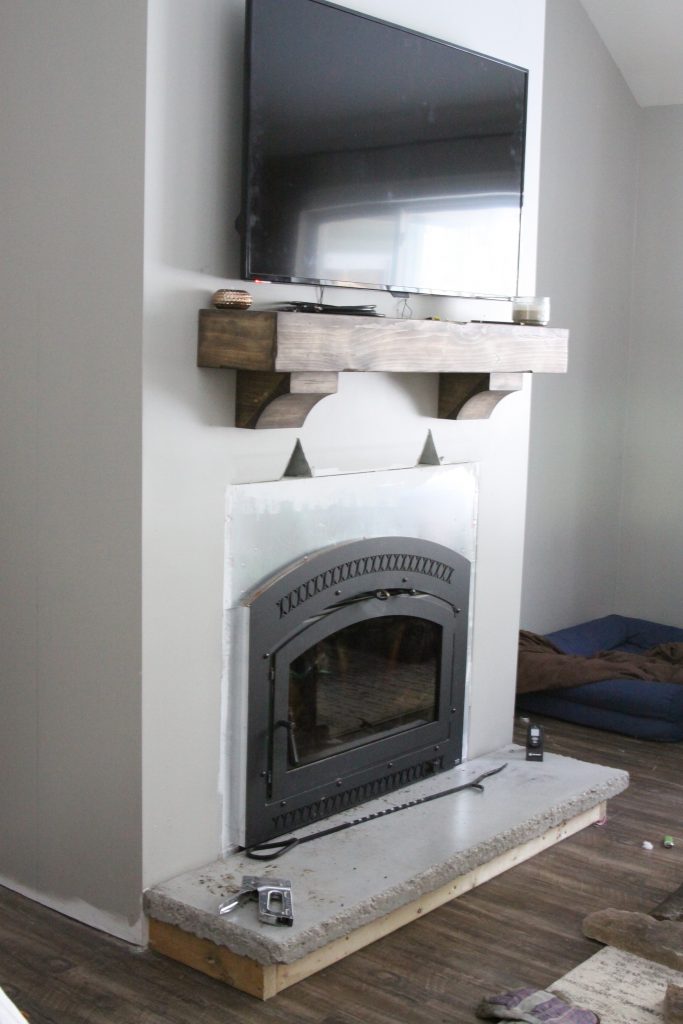
I wanted something similar to the short mantel but much bigger. I also wanted it to wrap around to give the stone a good stopping point. I came up with a plan and bought 1×6 lumber for the face (which would be the front), 1×8 lumber for the top and bottom (which would be how far it jutted out from the wall in the front) and 1×3 lumber for the sides’ top and bottom (which is how far it would come out from the wall on either side.) This may sound confusing, but it gets easier.
I started with the top front of the mantel. First, I cut a 45 degree angle on one end of the first 1×8, measured from the inside of the angle the width of the wall, which for me was 60 inches, and cut an opposite angle on the other end. I checked that it was going to sit tight against the wall by holding it up in place and matching the corners of the drywall with the angles of the lumber.

Next, I moved around the corner and began cutting the pieces for the top of the sides. I cut a 45 degree angle on one end of the first 1×3, then made a straight cut to end the mantel where the future shelves will be. If your mantel is going to be touching the wall, just measure from the short end of the angle to where the wall is, and make your cut there. Make sure your two angle pieces want to fit together tightly. If everything works out, cut anothe 1×3 exactly the same way to go around the other corner.

Next, I moved into making the face. For this, I used 1×6’s, and I started on one of the sides. Since I was going from a 1×8 in the front to a 1×3 on the side, I couldn’t just make all of the corners come together in one spot. I had to measure from the front side of the 1×8 to the back side of the 1×3 to get the total depth of the mantel. This is how long I needed my 1×6 to be. I then cut a 45 degree angle through the 1×6 from top to bottom.

When I found that everything fit together exactly as I needed it to, I cut another 1×6 the same way, so each side was the same.
Then I measured how long the last piece of 1×6 needed to be, which would be the front face of the mantel. I cut 45 degree angles through the 1×6 from top to bottom here, too. At this point it was starting to look like something.

This is how the corners all fit together.

At this point, I decided to secure the pieces together so if any of the cuts needed to be adjusted, I could do so before cutting the bottom pieces of the project. I used wood glue on each of the joints, secured with 2″ trim nails.

This is what it looks like when it’s all put together. I use a wet piece of paper towel to wipe off any excess glue.

To finish the structure of the mantel, I basically made the same cuts I did at the beginning of the project, mirroring the top to the bottom. I then glued and nailed the remaining pieces together, completing the box.

Next I sanded with 60, 150, then 220 sandpaper to make it nice and smooth. I can imagine that if you wanted to, you could skip this step. I’m picturing something that resemble a railroad tie. Although, I’ve never touched one so I can’t attest to what they actually feel like. I wanted my mantel to feel smooth and worn – so I dug out the sander!
After that, I wanted this to look like it came from a barn. It needed to be beat up and scratched a little. So I used some of my favorite tools – a hammer and a screw – to dig and scratch the lumber. My husband bought a concrete chisel recently, which worked really well to add some deeper gouges.


After I was satisfied with my destruction, I went on to fill in the seams where each piece of lumber met another. I gathered up some of the finest sawdust from when I was sanding and mixed it with wood glue to make a sawdust putty, and applied it to each joint.

I let it dry for about 30 minutes then went back over the joints with sandpaper to get them smooth.
Here is an idea of what a difference the sawdust/wood glue putty makes.
Before:

After:

Next, I moved on to staining and finishing. I really like to use Special Walnut stain from Minwax. I applied three coats to get just the right shade.

After getting the warmth I was looking for, I wanted to add a little more depth, so I quickly and lightly rubbed on a layer of Minwax Dark Walnut around the edges and into the deeper cracks I had produced with the chisel. I didn’t let the dark stain sit for more than a minute before wiping it off.


The combination of Special Walnut and Dark Walnut has turned into one of my favorite ways to finish wood. Especially when I’m trying to make new wood look old.
To hang the mantel on the wall I cut a piece of 2×4 to fit inside the box across the width of the wall. I then cut shorter pieces of 2×4’s to support the box coming outward from the wall. I used longer screws to secure this weird looking thing to the wall directly into the studs. The studs. Hit the studs. What was that? Oh yeah, secure it to the studs. Also, make sure it’s level!

I then slid the box over the weird 2×4 thing and used trim nails through the top of the mantel to make sure it wasn’t going anywhere. Just a side note – the fireplace is covered in a scratch-coat of mortar because the hubby was working on prepping that for stone. In case you were wondering.


I am really, really excited about this. The entire project only took me about 6 hours, including lunch, and less than $50 in materials. I’m in love!

I love it even more with the stone installed. If you would like the tutorial for how to accomplish that, you can find how we did it in my other blog post here.